AWS Copilot is a command line interface (CLI) that enables quick launch and easy manageability of containerized applications on AWS. Copilot automates each step in the application deployment lifecycle including pushing to a registry, creating a task definition, and creating a cluster. In this blog, you learn to launch a containerized application using AWS Copilot.
Step1: Pre-Requisite
You need to have an AWS account with administrative access to complete the all tasks. If you don’t have an AWS account, kindly use the link to create free trial account for AWS.
Step2: Create IAM User
Let’s create an IAM user which is used to containerize the application using Amazon Copilot in Amazon Cloud9. When building the exercise, we tried to use Cloud9 temporary managed credentials but we were getting credentials reset error; hence we used IAM user credentials in Cloud9.
- Login to the AWS Console and select Ireland as the region.
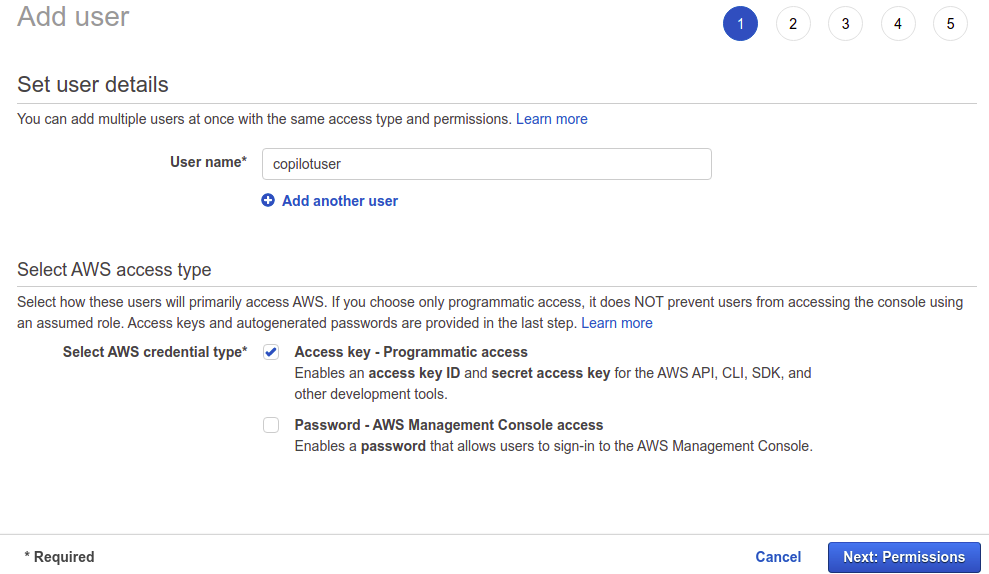
- Go to IAM Management Console, click on the Users menu in the left and then click on the Add user button.

3. On the next screen, type in copilotuser as the user name and select Programmatic access as the option for the access type. Click on the Next: Permissions button.
4. On the next screen, select Attach existing policies directly option. Select AdministratorAccess as the policy and click on the Next: Tags button.

5. On the next screen, click on the Next: Review button.
6. On the next Review screen, click on the Create user button. It creates the user and it also generates Access key ID and Secret access key. Click on the Download.csv link to download the keys. Note: please make sure you make note of the keys as you need them in the later steps.

7. In the next step, you create a Cloud9 environment which is used to run Amazon Copilot commands.
Step3: Create Cloud9 Environment
You use an Amazon Cloud9 environment to create container application and then deploy it using AWS Copilot commands.
- Go to the AWS Cloud9 console and click on the Create environment button.

2. On the next screen, enter copilotenvironment as the name and click on the Next step button.

3. On the next screen, select Environment type as Create a new EC2 instance for environment (direct access). Select Instance type as m5.large (8 GiB RAM + 2 vCPU). Select Amazon Linux for the Platform. Keep rest of the fields with the default values and click on the Next step button.

4. On the next screen, click on the Create environment button.
5. It will take couple of minutes to create the environment. In the next step, you will deploy AWS Copilot in the environment.
Step4: Configure Cloud9 Environment
In the Cloud9 environment, you deploy Docker and AWS Copilot CLI.
- In the AWS Cloud9 console, run the following commands one by one to install docker.
sudo yum update -y

sudo yum install docker

sudo service docker start
2. Run docker –version command to verify the docker installation.
3. Run the following commands one by one to install AWS Copilot.
sudo curl -Lo /usr/local/bin/copilot https://github.com/aws/copilot-cli/releases/download/v0.4.0/copilot-linux-v0.4.0

sudo chmod +x /usr/local/bin/copilot

4. Next run the command copilot –help to verify if Copilot CLI is deployed.

5. The Cloud9 Environment is ready. You create your container application in the next step.
Step5: Create Container Application
In this step, you create a sample container application and later use AWS Copilot CLI to deploy it.
- In Cloud9 environment, use New File menu option under File to create a new file index.html. Copy-paste the following HTML code into it.

2. Next you create another file Dockerfile with the following code.

<!doctype html>
<html lang="en">
<head>
  <title>Docker Sample Application</title>
</head>
<body>
  <h2>Docker Sample Application</h2>
</body>
</html>
3. The sample application is ready. It is time to deploy it using AWS CoPilot CLI commands.
Step6: Deploy Container Application
In this step, you deploy the sample container application using AWS CoPilot CLI commands.
- You will use the IAM user credentials created in the previous steps to run the AWS CoPilot CLI commands. Run the following commands one by one. Replace «Access-Id» with access id of the copilotuser IAM User. Replace «Secret-Key» with secret key of the dojouser IAM User. You made note of these credentials in the previous steps.
export AWS_ACCESS_KEY_ID=<<Access-Id>>
export AWS_SECRET_ACCESS_KEY=<<Secret-Key>>
export AWS_DEFAULT_REGION=eu-west-1
2. In Cloud9 environment, run copilot init command. It will ask series of question which you need to answer to configure the deployment. The questions are as the following and you provide response as mentioned below.
What would you like to name your application? [? for help]
Enter – copilotdemowebapp
Which service type best represents your service’s architecture? [Use arrows to move, type to filter, ? for more help]
          > Load Balanced Web Service

            Backend Service
Select Load Balanced Web Service and enter.
What do you want to name this Load Balanced Web Service? [? for help]
Enter – copilotdemowebapplb
Which Dockerfile would you like to use for copilotdemowebapp? [Use arrows to move, type to filter, ? for more help]
> ./Dockerfile
Select./Dockerfile and enter.
3. It will take some time to configure the manifest file for the application deploy. It then asks – Would you like to deploy a test environment?. Type in y and enter.

4. It will start creating the deployment environment.
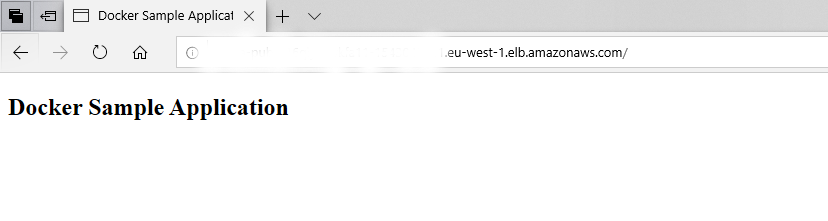
5. It will ask to tag the container image (Input an image tag value:). Type in copilotwebapp and enter. It will take some time to complete the deployment. When the deployment finishes, you can see the URL for the application deployed.
6. You can access the URL to verify the application deployed.
7. The application has been deployed. There are many other AWS CoPilot commands to list the applications, show environment details, show logs etc. It is recommended to refer AWS Copilot documentation for that.
Step7: Review the Resources Created
It is worth going through the key resources AWS Copilot created in order to deploy the application.
ECS Task Definition:

ECS Cluster and Service:

Load Balancer:

ECR Image:

Bingo..!!! Go to the next step to clean up the resources so that you don’t incur any cost.
Step8: Clean up
Run the command copilot app delete –env-profiles test=default in the Cloud9 environment to delete the deployment of the application. Alternative – you can delete the CloudFormation stacks which were created.
Delete the copilotenvironment Cloud9 Environment.
Delete copilotuser IAM User in the IAM Management console.
Hope you enjoyed this activity.
OK, folks that’s it for this post. Have a nice day guys…… Stay tuned…..!!!!!
Don’t forget to like & share this post on social networks!!! I will keep on updating this blog. Please do follow!!!
