Microsoft SQL on Linux vs Microsoft SQL on Windows

Traditionally, SQL Server is a Windows-based relational database engine. Microsoft introduced SQL Server 2017 in both Windows and Linux platforms. The question is how they compare.  

This blogpost will walk through the differences. Let’s begin our journey into SQL Server on Linux.

Note: This blogpost focuses on SQL Server 2019 version for comparisons on both Linux and Windows SQL.

Supported platforms for SQL Server on Linux are the following:

  •  Red Hat Enterprise Linux 7.7 – 7.9, or 8.0 – 8.3 Server
  •  SUSE Enterprise Linux Server v12 SP3 – SP5
  • Ubuntu 16.04 LTS, 18.04 LTS, 20.04 LTS
  • Docker Engine 1.8+ on Windows, Mac, or Linux

What are the system requirements for SQL Server on Linux?

SQL Server has the following minimum requirements for SQL Server for Linux:

  • Processors: x-64 compatible
  • Memory: 2 GB
  • Number of cores: 2 cores
  • Processor speed: 2 GHz
  • Disk space: 6 GB
  • File system: XFS or EXT4
  • Network File System (NFS): NFS version 4.2 or higher

Note: You can only mount the /var/opt/mssql directory on the NFS mount.

What are the supported editions of SQL Server on Linux?

In this section, we talk about different editions of SQL Server on Linux, and their use-cases. These editions are similar to the SQL Server on Windows environment.

EnterpriseThe Enterprise edition is Microsoft’s premium offering for relational databases. It offers all high-end data center capabilities for mission-critical workloads along with high availability and disaster recovery solutions.
StandardThe Standard edition has an essential data management and business intelligence database.
DeveloperThe Developer Edition has all features of the enterprise edition. It cannot be used in production systems. However, it can be used for development and test environments.
WebThe Web edition is a low-cost database system for Web hosting and Web VAPs.
Express editionThe Express edition is a free database for learning and building small data-driven applications. It is suitable for software vendors, developers.

Editions of SQL Server on Linux and Windows

The editions specified below apply to both Windows SQL Server and Linux:

FeatureExpressWebStandardDeveloperEnterprise
Maximum relational database size10 GB524 PB524 PB524 PB524 PB
Maximum memory1410 MB64 GB128 GBOperating System MaximumOperating System Maximum
Maximum compute capacity – DB engine1 socket or 4 cores4 sockets or 24 cores4 sockets or 24 coresOperating system maximumOperating system maximum
Maximum compute capacity – Analysis or Reporting service1 socket or 4 cores4 sockets or 24 cores4 sockets or 24 coresOperating system maximumOperating system maximum
Log shippingNASupportedYesYesYes
Backup compressionNANAYesYesYes
Always On failover cluster instanceNANAYesYesYes
Always On availability groupsNANANAYesYes
Basic availability groupNANAYesNANA
Clusterless availability groupNANAYesYesYes
Online indexingNANANAYesYes
Hot add memory and CPUNANANAYesYes
Backup encryptionNANANAYesYes
PartitioningYesYesYesYesYes
In-Memory OLTPYesYesYesYesYes
Always EncryptedYesYesYesYesYes
Dedicated admin connectionYes, it requires a trace flagYesYesYesYes
Performance data collectorNAYesYesYesYes
Query StoreYesYesYesYesYes
Internationalization supportYesYesYesYesYes
Full-text and semantic searchYesYesYesYesYes
Integration ServicesYesNAYesYesYes

Note: You can refer to Microsoft documentation for detailed features details and comparison.

Features not supported by SQL Server on Linux

The following SQL Server features are not supported on Linux.

  • Is there any difference in the SQL Server licensing on Linux and Windows?

There is no difference in the licensing for Windows and SQL Server Linux. You can use the licenses on the cross-platforms. For example, if you have a Windows-based license, you can use it for Linux SQL Server.

Database Engine featuresMerge replication
Distributed query with 3rd-party connections
File table, FILESTREAM
Buffer Pool Extension
Backup to URL (page blobs)
SQL Server AgentAlerts
Managed backups
CmdExec, PowerShell, Queue Reader, SSIS, SSAS, SSRS
ServicesSQL Server Browser
Analysis service
Reporting service
R services
Data Quality Services
Master data service
SecurityAD Authentication for Linked Servers
AD Authentication for Availability Group (AG) Endpoints
Extensible Key Management (EKM)
  • Can you use SQL Server Management Studio for connecting with SQL Server on Linux?

Yes, we can use it. However, the SQL Server Management Studio ( SSMS) can be installed on a Windows server and remotely access the Linux SQL Server.

  • Do we require a specific version of SQL Server to move from SQL Server Windows to Linux?

No, you can move your existing databases in any version of SQL Server from Windows to Linux.

  • Can we migrate databases from Oracle or other database engines to SQL Server on Linux?

Yes,  you can use SQL Server Migration Assistant (SSMA) for migrating from Microsoft Access, MySQL, DB2, Oracle or SAP ASE to SQL Server on Linux.

  • Can we install SQL Server for Linux on Linux Subsystem for Windows 10?

No, Linux Subsystem for Windows 10 is not supported.

  • Can we perform an unattended installation of SQL Server on Linux?

Yes.

  • Is there any tool to install on Linux SQL Server for connection or executing queries?

Yes, you can install Azure Data Studio on Linux as well. It is a cross-database platform tool with rich features for development, such as below.

  • Code editor with IntelliSense
  • Code snippets
  • Customizable Server and Database Dashboards
  • Integrated Terminal for Bash, PowerShell, sqlcmd, BCP, and ssh
  • Extensions for additional features

You can refer to Microsoft documentation for more details on Azure Data Studio.

  • Do we have a utility like SQL Server Configuration Manager for Linux?

SQL Server Configuration Manager lists down SQL Services, their status, network protocols, ports, file system configurations in a graphical window for Windows.

SQL Server Linux includes a command-line utility mssql-conf for these configurations.

  • Can we use Active Directory Authentication for SQL Server on Linux?

Yes, you can configure and use AD credentials to connect SQL Server on Linux with AD authentications.

  • Can we configure the replication from Windows to Linux or vice versa?

Yes, you can use read scale replicas for one-way data replication between Windows to Linux SQL or vice versa.

Conclusion

It is essential to know the SQL Server on Linux edition, features and how it is different from SQL Server running on Windows. Therefore, this article provided a comparison between SQL Server on Windows and Linux operating systems. You should understand the differences and evaluate your requirements while planning to move your databases to SQL Server on Linux.

OK, folks that’s it for this post. Have a nice day guys…… Stay tuned…..!!!!!

Don’t forget to like & share this post on social networks!!! I will keep on updating this blog. Please do follow!!!

Microsoft SQL Server on Linux – Getting Started

Microsoft SQL Server is an excellent choice for a relational database with key benefits including performance, security, reliability, and total cost of ownership. A few exciting features of SQL Server are outlined below:

  • SQL Server supports Python, R, Java, Spark with the combination of relational database and Artificial Intelligence (AI)
  • Database administrators and developers can choose the supported platform and language.
  • Available Platforms: Windows, Linux (RedHat, SUSE, Ubuntu), Docker containers.
  • Available Languages: CC++, PHP, Java, Node.js, Python, Ruby.
  • SQL Server is the best relational database according to performance benchmarks. TPC-H 1TB, 10TB and 30TB SQL Server is considered the most secure database as per the National Institute of Standards and Technology (NIST). It supports Transparent Data Encryption, Column level encryption, Static and Dynamic data masking, Data discovery and classification, Certificates, SSL. SQL Server also allows for accessing external data from Hadoop clusters, NoSQL databases, Oracle, SAP Hana, Big data as external tables using PolyBase as well. SQL Server provides high availability and disaster recovery solutions such as the restoration of backups, log shipping, Always On Availability groups with multiple secondary replicas in synchronous and asynchronous data commit

SQL Server On Linux – Introduction

Image Reference: Microsoft cloud blogs

When we think about SQL Server, we always think about it as running on Windows. Starting from SQL Server 2017, you can run it on Linux as well.  

Microsoft executive vice president Scott Guthrie states: “Bringing SQL Server to Linux is another way we are making our products and new innovations more accessible to a broader set of users and meeting them where they are”.

SQL Server on Linux is an enterprise-ready relational database with industry-leading capabilities and robust business continuity. It combines the Microsoft SQL Server on a best-known and most-used open-source operating system Linux.

Supported SQL Server Flavors on Linux

  • Supported SQL Server flavors on Linux include Red Hat Enterprise Linux, SUSE Linux, Enterprise Server, Ubuntu, Kubernetes clusters, and Docker containers. That means that you will no longer have to worry about what Linux servers does your SQL Server support when choosing one!

The following image gives a high-level process model overview of the platform abstraction layer and its communication with Linux OS:

Image Reference: Microsoft cloud blogs

 Why Should You Run SQL Server on Linux?

You might be curious to learn more about SQL Server on Linux and wonder whether you can use it for critical databases. Therefore, let me tell you a few reasons you should:

  • Open-source platform: Linux is an open-source operating system. The Linux operating system requires low computing resources (RAM, CPU) if we compare it to other operating systems. Therefore, you can reduce the cost of an operating system license.
  • SQL Server license: You can move your existing Windows-based SQL Server Licenses to SQL Server at Linux without any additional cost. Therefore, you can plan to move Linux based SQL Server without worrying about licenses.
  • Enterprise-level features: SQL Server on Linux is an enterprise-ready database. It has features such as high availability and disaster recovery with Always On Availability Groups. You can also combine Always-on availability groups between Windows and Linux operating systems.
  • Simple backups: You can restore your database from Windows to Linux and vice-a-versa using a simple backup and restore method. Therefore, you can quickly move databases without worrying about the underlying operating system with multiple database environments.
  • Industry-leading performance: SQL Server Linux is tested on the TPC-E benchmark. It is ranked number 1 in the TPC-H1 TB, 10TB, 30 TB benchmarks.
  • Security: As per the Microsoft docs, the NIST institute rated SQL Server on Linux as the most secure database.
  • Simple installation: SQL Server on Linux supports command-line installation. It is quick, simple, and comparatively faster than installing on Windows Server.
  • Database upgrades: You can move out of unsupported SQL Server versions such as SQL Server 2008 R2 into SQL Server 2017 or 2019 Linux with simplified database migrations.
  • Quick deployments: SQL Server on Linux supports a docker container where you can deploy SQL Server within a few seconds. It helps developers build a container with SQL Server image and test their code without waiting for virtual machines or higher-end servers. The container can be deployed in the Azure cloud infrastructure. You can also use Kubernetes or Docker Swarm as an orchestration tool for managing many containers.
  • Similar functionality to T-SQL: The SQL Server on Linux uses similar T-SQL scripts, maintenance plans, backup mechanisms and routine administrative tasks. The users with Windows background can quickly get familiar with it without realizing much difference in the underlying operating system.
  • Data virtualization hub: SQL Server on Linux can act as a data virtualization hub by setting up external tables from Hadoop, Azure Blob Storage accounts, Oracle, PostgreSQL, MongoDB, and ODBC data sources.
  • Platform abstraction layer: Microsoft introduced a Platform Abstraction Layer (PAL) for database compatibility into a Linux environment. The PAL aligns operating system or platform-specific code in a single place. For example, the Linux setup includes about 81 MB of the uncompressed Windows libraries for SQLPAL.

Features of SQL Server on Linux

This section explores a few key features of the SQL Server on Linux that can justify migrating to SQL Server on Linux.

Performance

SQL Server on Linux offers Hybrid Transactional Analytical Processing, a.k.a. HTAP, for fast transaction throughput, responsive analytics. The HTAP uses the following performance features:

  • In-Memory Online Transaction Processing (OLTP) – It contains memory-optimized tables and compiled stored procedures for improving the performance of heavy transactional applications. It can increase workload performance up to 30-100x.
  • Columnstore indexes – SQL Server on Linux supports the Columnstore index and the Rowstore indexes to improve  the performance of analytical queries.
  • Query store – The query store helps database administrators to monitor query performance and query regressions, their execution plan changes over time and reverts to the plan with the lowest query overhead.
  • Automatic tuning – In automatic tuning, SQL Server monitors the query performance based on the query store data. If it finds a new query plan causing an impact on performance, it reverts the old plan automatically without DBA intervention.
  • Intelligent query processing – There are features available from SQL Server 2019 for automatically improving query performance based on query workloads and collected statistics. It contains the following features:
    • Adaptive joins – SQL Server can automatically and dynamically select the join type as per the number of input rows.
    • Distinct approximate count – SQL Server can return an approximate count of the distinct number of rows with high performance and minimum resources.
    • Memory grant feedback – Sometimes we observe a spill to disk while executing large resource-intensive queries. It wastes assigned memory and impacts other queries as well. Therefore, the memory grant feedback helps SQL Server to avoid memory wastage based on the memory feedback.
    • Table variable cardinality – SQL Server on Linux can use the actual table variable cardinality instead of a fixed guess.

Security

Security is a critical feature for a relational database. Therefore, SQL Server on Linux contains advanced security features in all editions, including the standard edition:

  • Transparent Data Encryption (TDE) – The TDE features encrypt data files and database backups in rest. It protects the database from any malicious activity where the intruder grabs data files or backup files for accessing data.
  • Always Encrypted – The always encrypted features allow only applications to view and process the data. The developers and database administrators (highest privilege) cannot view original data (data that is decrypted). The encryption and decryption both take place on the client drivers. Therefore, data is encrypted both in-rest and in-motion.
  • Column-level Encryption – In column-level encryption, you can use certificates to encrypt the columns with sensitive information such as PII data and credit card numbers.
  • SQL Server Certificates – You can use SQL Server certificates for securing and encrypting all connections to the SQL Server on Linux.
  • Auditing – Auditing tracks specific events for capturing any malicious activity. You can view the event logs and audit files to help you investigate any data breaches.
  • Row-level Security – Row-level security allows users to view data based on user credentials. For example, the user can view only rows he is allowed to see. It prevents users from viewing or modifying other users’ data.
  • Dynamic Data Masking – Dynamic data masking can mask the data in a column based on the masking functions. It can work with data such as email addresses, credit card numbers, social security numbers. For example, you can mask credit card numbers to display only the last four-digit numbers in the format of XXXX-XXXX-XXXX-1234.
  • Data Discovery and Classification – It is essential to identify, label and report sensitive data stored in your database. The Data discovery and classification tool can generate a report to discover sensitive data such as PII and classify the data based on the sensitivity.
  • Vulnerability Assessment – The vulnerability assessment can identify configurations and database design that can be vulnerable to common malicious attacks for your instance and database.

High Availability

For a production database, the high availability and disaster recovery mechanism is very essential. Therefore, SQL Server on Linux includes the following high availability features:

  • Always on availability groups – You can configure availability groups between standalone SQL Server on Linux instances in an asynchronous way.
  • Always On failover clusters – SQL Server on Linux supports a pacemaker for providing a synchronous copy of the database in the same or a different data Centre. You can extend your Windows-based SQL Server Availability group with a Linux SQL Server replica node.
  • Log Shipping Using the SQL Agent – The log shipping works on the transaction log backups to provide warm stand-by data copies without complex configurations.
  • Containers Orchestrated Tools – You can use container orchestrated tools such as Kubernetes for enhancing SQL Server availability. It ensures that if a specific node of SQL Server is down, another node is bootstrapped automatically. Further, you can use always-on availability groups in Kubernetes clusters.

Machine Learning Services

SQL Server on Linux supports machine learning models using R and Python scripts for data stored in your databases. Machine learning can help you do real-time predictive analytics on both operational and analytic data. You can add data science frameworks PyTorch, TensorFlow, Scikit-learn for enhancing Automation tasks capabilities using machine learning.

PolyBase

SQL Server on Linux supports PolyBase, where you can configure external tables with Oracle, Big Data, SAP HANA, Hadoop, NoSQL Databases as a data virtualization tool. It eliminates the ETL transformation where you need to import or export data into SQL Server before querying it.

Graph Database

SQL Server on Linux supports graph databases where it stores data as entities (nodes) and relationships(edges) for semantic queries

Full-text Search

The SQL Server Linux supports full-text services for executing queries against the text data efficiently.

SQL Server Integration Service (SSIS) Packages

SSIS packages can connect with the SQL Server on Linux databases or SQL Server in a container similar to the Windows-based SQL Server instance.

Conclusion

This article provided you with some high-level introduction to SQL Server on Linux, we went through its features. It lists why organizations should consider using SQL Server as their database solution on Linux operating systems and containers.

OK, folks that’s it for this post. Have a nice day guys…… Stay tuned…..!!!!!

Don’t forget to like & share this post on social networks!!! I will keep on updating this blog. Please do follow!!!

AWS EC2 Instance Purchasing Options – All You Need to Know

In this post I will let you know various EC2 instance purchasing options AWS provides you so that you can serve your workload in the most cost effective manner.

AWS EC2 Instance Purchasing Options

  1. On-Demand Instances
  2. Reserved Instances 
  3. Savings Plans 
  4. Spot Instances 
  5. Dedicated Hosts 
  6. Dedicated Instances
  7. Capacity Reservations

1. On-Demand Instance

This is one of the most flexible option to launch an EC2 instance in AWS. You pay per second of compute capacity that you launch.

  • No commitment is needed from your side and you may decide to terminate your instance after 5 minutes and it’s absolutely fine.
  • You are in complete control of lifecycle for example when to launch , stop, hibernate, reboot or terminate it. You pay only for seconds when your instance is in running state. You can find price per second here.
  • AWS doesn’t guarantee that your instance will be launched. Although AWS always tries to launch your instance and to be honest I have never faced that I requested an on-demand instance and it’s not launched But there still can be peak load on AWS side when your instance is not launched on request
  • It is well suited for short term or irregular workload which can not be interrupted.
  • You can use it for application development/testing

2. Reserved Instances

Reserved Instances provides huge savings on your EC2 instances compared to on-demand up to 72%. All you need is to commit to a specific instance configuration, instance type and duration which can be either 1 or 3 years.

  • Well suited for consistent workload for example a database
  • In other words, you can use this option to reserve the compute capacity with a commitment of duration and config
  • Reservation period can be either 1 year or 3 year. Please not that it’s not 1-3 years , it’s either 1 or 3. No other option
  • You can use convertible reserved instances if you ever want to change instance type but discount will be less in that case
  • There is a limit on number of reserved running instances of 20 per Region. However, you can request a limit increase anytime if you need.

Important Note: Previously there uses to be a Scheduled Reserved Instances option in reserved instances. which lets you reserve capacity that is scheduled to recur daily, weekly, or monthly, with a specified start time and duration, for a one-year term. But as of now AWS is not offering this. You can check more details here

3. Savings Plans

This is a newer plan by AWS and it helps you reduce your EC2 cost if you make a commitment that you will use it for a specific duration that should either 1 or 3 years but the added advantage on top of reserved instance is that you are allowed to change instance configuration/types.

  • Savings plan provides significant cost saving as compared to on-demand at the same time is flexible enough to let you change configurations/instance types
  • There is no limit on running instances
  • After AWS came up with Savings Plan, I don’t think there are needs to go with Reserved Instance. Savings plan is far more flexible

4. Spot Instances

Spot instances are one of the most cost effective options to launch an EC2 instance on AWS but your instance can be taken from you at any time.

  • Ideally you request unused EC2 instances and that’s the reason they are most cost effective and provides cost saving of 90% as compared to on-demand
  • You bid the price and get the instance when the bid price is under that
  • Your instances will be reclaimed from you as soon as bid price goes beyond the threshold with 2 minutes of notification
  • Instance can be taken back from you at any time
  • Suitable for workload that can handle interruption well by providing compute at cheapest price
  • Not suitable for critical workload or workload that can’t handle interruption.

5. Dedicated Hosts

A dedicated host is a real physical server that you can book. Which means it’s full EC2 capacity is for your use. No body else can launch an EC2 instance on that server.

  • Dedicated host allows you to use your existing server license(Bring your own licensee- BYOL)
  • Lets you meet your regulatory/compliance requirement
  • You have complete visibility and control over how instances are placed on the server.

6. Dedicated Instances

Dedicated instances provides you with dedicated hardware for your EC2 instances.

  • May share hardware with instances that are in your account
  • No control on instance placement

7. Capacity Reservations

As I said in On-Demand section that AWS doesn’t gives 100% guarantee that your instance will be launched. What if you need some capacity reserved but don’t want to go on long term commitment of 1 or 3 year.

In this case you can reserve capacity and you can cancel it if you don’t need it. It doesn’t provide you any cost benefit but gives you surety that you will not run out of capacity.

  • Doesn’t require any commitment. You can create capacity reservation when you need it and cancel it when you don’t need it. Its that simple.
  • Capacity reservation happens in a specific availability zone
  • Doesn’t provide any billing discount

Conclusion

In this quick article, I shared with you the EC2 instance purchasing options provided by AWS so that you can balance your cost with your requirement.

We learnt that On-Demand is the most flexible at the same time costilest option to launch your instance while Spot instances are cheapest but they can be taken back from you at any time.

Savings Plan is a good option when you are buying an instance for a long term like 1 or 3 years. As it allows you to change certain configurations at later times, it doesn’t make sense to go with reserved instances any more.

Dedicated host you can think of when you have some compliance requirement or you want you reuse your existing server license.

OK, folks that’s it for this post. Have a nice day guys…… Stay tuned…..!!!!!

Don’t forget to like & share this post on social networks!!! I will keep on updating this blog. Please do follow!!!

Getting Started with Amazon Elastic Container Service

Below Tasks are involved for this scenario –

  • Pre-requisite
  • Create ECR Repository
  • Create Cloud9 Environment
  • Create Docker Image
  • Launch ECS Cluster
  • Create Task Definition
  • Create Service & ALB implementation
  • Test your App
  • Clean up

Pre-requisite

You need to have an AWS account with administrative access to complete the Task list. If you don’t have an AWS account, kindly use the link to create free trial account for AWS.

Create ECR Repository

Let’s start with creating a repository for the Docker image in AWS ECR. Later when you create a Docker image in Cloud9 IDE, you can push the image to this repository for the deployment.

  1. Login to the AWS Console and select Paris as the region.
  2. Go to the AWS Elastic Container Services (ECS) console and click on the Repositories menu in the left and then click on the Create repository button.

3. On the next screen, select Private for the visibility settings. Enter flask-app-demo as the repository name and click on the Create repository button.

4. The repository is created in no time. Select the repository created and click on the View push commands button.

5. In popup window, you can see the commands which are used to push the Docker image to the repository from the development environment. You will use these commands later in the Cloud9 IDE environment.

6. The repository is ready. You now create and configure Cloud9 environment.

Create Cloud9 Environment

You will launch AWS Cloud9 environment. When you launch an environment, it starts an Amazon EC2 instance in the background and uses it with AWS Cloud9 IDE as the development machine.

  1. Go to the AWS Cloud9 console and click on the Create environment button.

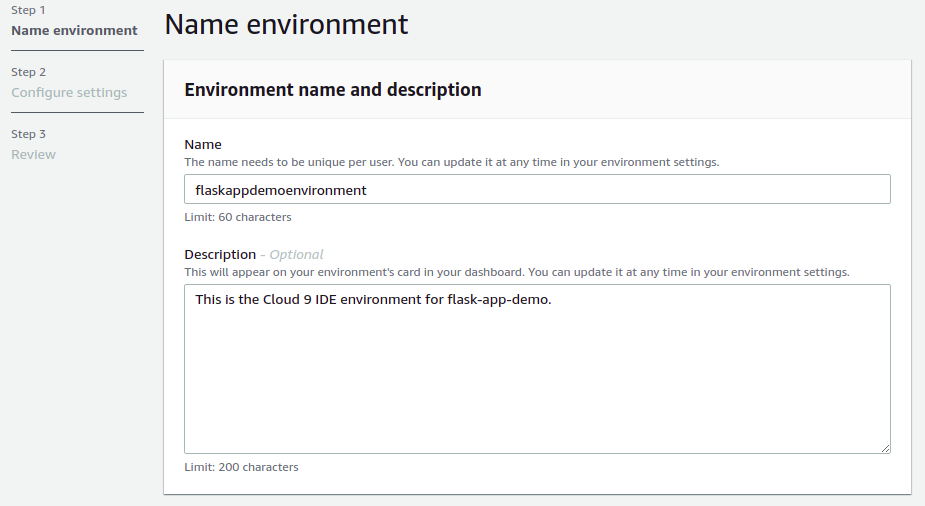
2. On the next screen, enter flaskappdemoenvironment as the name and click on the Next step button.

3. On the next screen, select Environment type as Create a new instance for environment (EC2). Select Instance type as t3.small (2 GiB RAM + 2 vCPU). Select Ubuntu Server 18.04 LTS for the Platform. The development environment will have Ubuntu as the operating system. Keep rest of the fields with the default values and click on the Next step button.

4. On the next screen, click on the Create environment button.

5. It will take couple of minutes to create the environment. Wait for the environment to be ready. Once it is ready, you can see console window in the bottom part of the screen. It provides console base access to the development machine.

6. You will now configure the environment for the Docker. Run the following command in the console to update the environment.

7. The Docker is installed and configured. Run the following command to check the version of the Docker installed.

8. With environment ready, it is time to create the Docker package.

Create Docker Image

You create a Docker image and then upload to the AWS ECR repository. You will create Docker image with a sample python file app.py which deploys a Flask application.

  1. In AWS Cloud9 IDE, create a file app.py and copy paste the following code. The code is running a simple Flask application. The 0.0.0.0 is a wildcard IP address that will match any possible incoming port on the host machine. The application port is changed to 80 from the default 5000.

from flask import Flask

app = Flask(name)

@app.route(‘/’)
def hello():
return “Welcome to Dummy Flask Web App Page”

if name == ‘main‘:
app.run(host=”0.0.0.0″, port=80)

2. In AWS Cloud9 IDE, create another file with the name Dockerfile and copy paste the following script. The script is using Python:3 as the base image from the DockerHub. Copies app.py file to the root. Installs Flask python package and finally runs app.py file.

FROM python:3

ADD app.py /

RUN pip install Flask

ENTRYPOINT python app.py

3. The files are ready. You will use the push commands from the AWS ECR repository to create and upload the Docker image. Run the following command in the console to authenticate to the ECR registry. Replace with the code of the region you are using. Replace with the account number of the AWS account you are using.

aws ecr get-login-password --region <Region-Code> | docker login --username AWS --password-stdin <Account-Number>.dkr.ecr.<Region-Code>.amazonaws.com

4. Next you run the following command in the console to create the Docker image. There is a dot in the end of the command, copy the complete command.

5. Next you run the following command to tag the image so you can push the image to the repository. Replace with the code of the region you are using for the workshop. Replace with the account number of the AWS account you are using.

docker tag flask-app-demo:latest <Account-Number>.dkr.ecr.<Region-Code>.amazonaws.com/flask-app-demo:latest

6. Finally, run the following command to push the image to the AWS ECR repository. Replace with the code of the region you are using for the workshop. Replace with the account number of the AWS account you are using.

docker push <Account-Number>.dkr.ecr.<Region-Code>.amazonaws.com/flask-app-demo:latest

7. The Docker image has been pushed to the AWS ECR repository. You can verify it by opening the flask-app-demo repository in the AWS ECS console. Make note of the Image URI as you need it later when configuring container in Amazon ECS.

8. The image is ready. Let’s start configuration of the ECS cluster and launch application based on the image.

Launch ECS Cluster

You launch ECS cluster where application is deployed based using the docker image.

  1. Goto the AWS Elastic Container Services (ECS) console and click on the Clusters menu in the left and then click on the Create Cluster button.

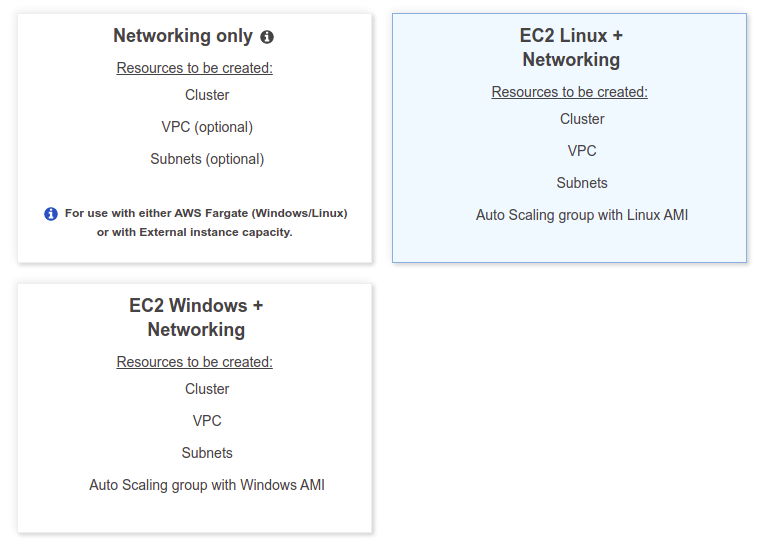
2. On the next screen, select EC2 Linux + Networking option and click on the Next step button.

3. On the next screen, type in dojocluster as the cluster name. Select On-Demand Instance for the provisioning model. Select t2.large as the instance type. Type in 2 for the number of instances. Select Amazon Linux 2 AMI for the EC2 AMI Id. Keep rest of the configuration to the default.

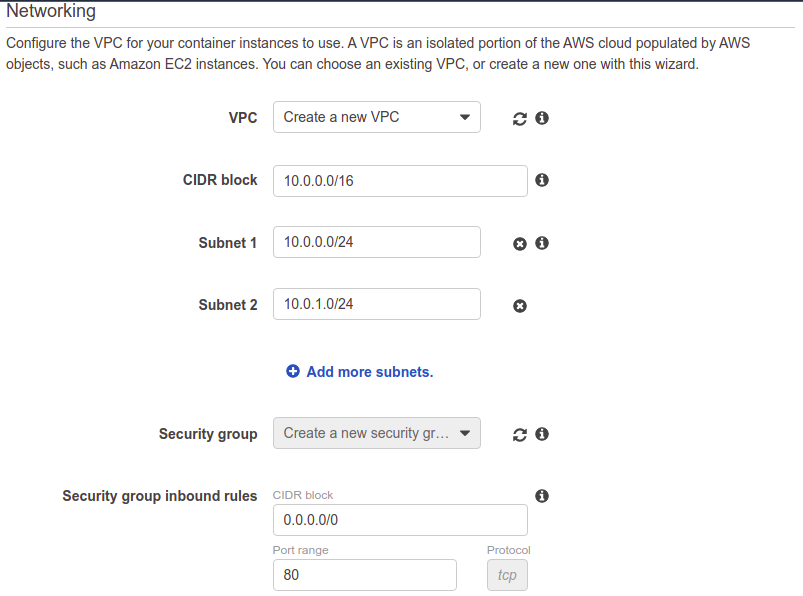
4. On the same screen, in the networking section, keep the configuration to the default as it will create a new VPC for the cluster and also configure security group taking traffic on port 80 from anywhere.

5. On the same screen, in the Container instance IAM role section, select Create new role for the IAM Role. Keep the rest of the configuration to the default and click on the Create button. If needed, we can enable the checkbox for Container Insights to proactively setup monitoring. For this, we did not enable it.

6. The cluster will be launched in no time. You now configure the task definition.

Create Task Definition

You create task definition which is used to run the docker image as a task on the ECS cluster.

  1. Go to the AWS Elastic Container Services (ECS) console and click on the Task Definitions menu in the left and then click on the Create new Task Definition button.

2. On the next screen, select EC2 option and click on the Next step button.

3. On the next screen, type in flasktask as the task name. Select None for the task role. Select default for the network mode.

4. On the same screen, type in 128 for the task memory and 2 vcpu for the task cpu. Click on the Add container button.

5. On the add container popup, type in flaskcontainer as the container name. Copy-paste docker image URI in the Image field. Type in 128 for the memory hard limit. Type in 80 for both host port and container port. Keep tcp for the protocol and click on the Add button.

6. The container gets added to the task definition. Finally, click on the Create button.

7. The task definition is created in no time. In the next step, you configure service for the ECS cluster.

Create Service & ALB implementation

You configure service which is used to launch a task using the task definition created earlier.

  1. Goto the AWS Elastic Container Services (ECS) console and click on the Clusters menu in the left and then click on the flaskcluster link.

2. On the next screen, under the Services tab, click on the Create button.

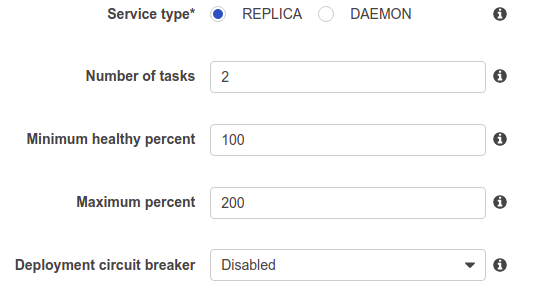
3. On the next screen, select EC2 for the launch type. Select flasktask as the task definition. Select flaskcluster for the cluster. Type in flaskservice as the service name. Select REPLICA as the service type. Select 2 for the number of tasks. Keep rest of the configuration to the default and click on the Next step button.

4. On the next screen, select Application Load Balancer for load balancer type and click on the Next step button.

In “load balancing” section, select Application Load Balancer and select your load balancer. You need to create an application load balancer in advance. I have already created an ALB in advance.
In “Container to load balance” section, create a new listener port 80 and create a new target group. Set health check path to our App path i.e. /. Then click on the next step and skip auto scaling for now and finally click on “Create Service.”

5. On the next screen, select Do not adjust the service’s desired count for service auto scaling and click on the Next step button.

6. On the next review screen, click on the Create service button. It will create the service. You can see the task running under the cluster. Click on the Tasks tab in the cluster to see the task running.

Test your App

Go to EC2 management console, click on Load Balancers, select the load balancer, we used for creating ECS service and grab its DNS name.

Go to your browser and access your App.

In this blog, we learnt how to create a simple flask application, containerize it using docker via AWS Cloud 9, upload docker image to ECR repository and deploy application in AWS Elastic Container Service (ECS) running under an Application Load Balancer.

Clean up

Delete the resources used for this demo to avoid any further cost.

  1. Delete the flaskcluster ECS Cluster
  2. Delete the flaskappdemoenvironment Cloud9 Environment.
  3. Delete the flask-app-demo ECR Repository.
  4. Delete the flasktask Task Definition.

Hope you enjoyed it.

OK, folks that’s it for this post. Have a nice day guys…… Stay tuned…..!!!!!

Don’t forget to like & share this post on social networks!!! I will keep on updating this blog. Please do follow!!!

Datacenter Migration – How To – Checklist

Datacenters are among the most complex and technologically advanced entities on the planet, with very complex systems, architecture, and network intricacies. What is a datacenter? Datacenters are dense concentrations of compute, storage, and network resources housed in a facility that provides resilient environmental, power, and network redundancy. Datacenters can be privately owned and managed, or they can be publicly owned with many privately managed “pods” of computer/server/network resources that are sold to various organizations. With all of the complexities involved with datacenter resources, there may be reasons that an organization decides to migrate from one datacenter to another datacenter. What are reasons for datacenter migration? What complexities and challenges are involved with doing this? What planning needs to happen beforehand? What needs to be documented? Is there a checklist that we can use to perform the datacenter migration successfully?

Reasons for Datacenter Migration

The reasons for migrating from one datacenter to another may be as complex as the datacenter themselves, however, generally speaking, there are a few reasons that you may decide to migrate resources from one datacenter to another ranging from business needs to technology needs. From a business perspective, there may be reasons that a datacenter migration makes sense whether it is a merger, acquisition, rightsizing resources, downsizing, or scaling out. Additionally, organizations may look to scale out from a high availability perspective and shift resources to various datacenters based on business needs.

As far as technology is concerned, datacenter technology is constantly changing and moving forward. There may be technology reasons for moving from one datacenter to another to improve features, and/or functionality. Additionally, an organization may decide to spread out resources across multiple regions to improve performance and resiliency of resources. Regardless of the exact reason for migrating datacenters, the complexities and processes that must be considered remain ever important to making sure the shifting of resources happens seamlessly without end users recognizing any outage or degradation in performance or service.

Establishing the Criteria and Goals of the Migration

The criteria and goals for datacenter migration can vary based on what business needs are or what the problem is that is trying to be solved with the migration. If the datacenter migration is only a partial migration to shift a subset of resources this will change the landscape of the migration versus migrating all resources from one datacenter to another datacenter.

Make sure to assess the criteria and goals of not only the technical aspects of the project but also the business goals of the project. This can help with making sure the business goals and impacts are thought through along with the technical goals.

What if we are migrating our current datacenter resources to the public cloud?

Public Cloud or Private Datacenter?

For many organizations, a datacenter migration may mean migrating from one private datacenter to another private datacenter. However, with the trend among organizations being moving more resources to the public cloud, a datacenter migration may mean moving from a private datacenter up to the public cloud via one of the public cloud vendors such as Amazon AWS, Microsoft Azure, or Google Compute Cloud.

There are different challenges with each migration that will need to be considered. With moving to public cloud, there will of course be no physical resources that will be moved, only virtual or logical resources. With physical private datacenter migrations to another private datacenter, there may be physical resources and assets that will be moved.

An example of how moving to a public cloud datacenter would drastically change things would be in the area of network communication. Taking Amazon AWS for instance, there is no concept of VLANs. The customer simply gets presented with an overlay network with native tools on top of a purely layer 3 network. So, you aren’t relying on VLANs for segmentation.

In the public cloud network, the network policy is host centric and not at the network level. The enforcement happens at the host level via security groups. Also, with Amazon the size of the network is fixed once you provision the VPC. So making sure you provision the correct size for your VPC network is critical on the frontend and is a good example of how planning the migration to the public cloud would need to be thought through carefully.

With private datacenter migrations, we could basically create a one for one scenario of infrastructure in the target datacenter and use a “cookie cutter” approach to provisioning resources in the target datacenter as they exist in the current production datacenter.

Planning Time

Generally speaking, a datacenter migration is a major undertaking that should not be underestimated in importance to completing successfully. A botched datacenter migration could potentially result in service interruption, data loss because of not appropriate business data backup, unhappy customers, brand reputation damage, and ultimately real damage to an organization that was lax in proper planning and preparation of the process.

With the above stated, planning for a datacenter migration shouldn’t happen in the span of a day or two. There may be weeks if not months of preparation. What would be included in the prep work to get ready for a datacenter migration?

  • Site survey of the existing datacenter and the new datacenter – One of the necessary items that needs to be done is a site survey of both the existing datacenter and the new datacenter. Are the existing physical resources in the current datacenter going to be moved? If so is cabling and other physical Layer 1 connectivity fully understood so this can be replicated in the target datacenter once the physical infrastructure is moved? If the physical resources are not being moved to the new datacenter, have adequate replacements for the existing infrastructure been provisioned?
  • Documenting everything – Are all the infrastructure requirements including storage, compute, network requirements, application requirements, and any other infrastructure requirements documented?
    • Too much documentation is better than not enough documentation
    • Make sure every rack, “U” of the rack, virtual machine, network, and application is documented whether considered important or not
  • Dependencies – Is it fully understood what dependencies exist in the current datacenter environment that need to be replicated in the target datacenter? Are there current ancillary systems in the current datacenter that need to be replicated in the target datacenter?
  • Network needs – What are the LAN and WAN considerations that need to be made for existing applications in the current datacenter that need to be considered for the new datacenter?

Private Datacenter:

  • VLANs – Are there VLANs that need to be provisioned in the new datacenter that are currently used in the existing datacenter
  • IP Addressing – What are the IP addressing needs of resources and applications in the current datacenter?
  • Do legacy applications rely on any hard-coded IP addresses that need to be flushed out before making the move to the new datacenter?
  • What are the WAN IP address concerns? Have all WAN IP address considerations been taken into account?
  • How will DNS and name resolution happen?
    • Will resources in the current datacenter and the new datacenter run in parallel allowing for shifting DNS gracefully allowing time for DNS convergence?
    • Will other mechanisms such as IP Anycast be used to advertise the same IP prefix from multiple locations and allow BGP or other routing protocols to route based on the costs and health of the links?
  • Have the necessary WAN circuits been ordered so that sufficient lead time is allowed to turn up the new circuits? Some ISPs may take as long as 90 days to turn up a new circuit. These time allowances should be built into any datacenter migration plan.

Public Cloud:

  • Since VLANs do not exist in public cloud, any layer 2 requirements would need to be thought through in reengineering network access
  • How many IP addresses do you need? What size does the subnet need to be? AWS defaults to /16 subnet
  • How does network security need to be setup? What security groups need to be taken into consideration?
  • 500 Security group limitation per VPC – Will your network require more security groups than are provided?
  • Will you need to provision multiple VPCs?
  • If moving to public cloud, most likely there will need to be automation tooling changes. Have these been considered?

Go Through a Mock Run of the Migration

While you may not be able to go through an entire nuts and bolts run of the process of the migration, having one or several test runs of the migration can be helpful. If you are also able to stage key components such as network transition items within a lab environment, this can help shed light on potential issues with applications, etc., before the actual migration takes place.

  • Talk through major points of the migration with key members of the team.
  • Know the order of events that need to be executed as most likely there will be some items that will require other items on the check list to be completed first.
  • Utilize lab environments to simulate the data center migration including network resources as well as application testing and troubleshooting.

Execution of the Data Center Migration

After all the planning has been done and resources are ready to turn up at the new datacenter location or the public cloud, it is time to execute the move. Considerations during the move:

  • Know who is responsible for which aspects of the move. The last thing you want to happen is for assumptions to be made and responsibilities for crucial aspects of the move to fall through the cracks.
  • Create a detailed action plan with everyone involved with the migration project. List out responsibilities.
  • Have contact information of everyone involved, phone numbers etc., so that time is not wasted trying to find contact information instead of working on potential issues that may arise.
  • Have additional vendor contacts on standby. This would include datacenter contacts, ISPs, network engineers, infrastructure engineers, ops engineers, etc.
  • Inform end users ahead of time either via electronic communications, banner page, etc. Be detailed in the maintenance window that should be expected as this will minimize the frustration of end users.
  • Have a team ready for triage in case of an influx of end user issues as a result of the resource migration.

Post Datacenter migration

Once the datacenter resources have been migrated, we need to quickly gauge any issues with performance or any other system issues as a result of the migration.

  • Have a team assigned to this task either via manual checks or automated means to validate the integrity of system processes and application availability after the migration.
  • If you receive traffic from various parts of the world, simulate traffic coming from different end points around the world so that you can test any discrepancies between geographic locations that may be caused by DNS convergence if name records have been changed.
  • Test not only for errors in applications, but also the performance of those applications.
  • If you expect performance improvements, have those improvements been realized?
  • Is performance worse, indicating an underlying issue with the migration?
  • Notify end users when the maintenance period is over and the system is expected to be performing normally. This will help end users to know if they may be experiencing a migration related issue or a real problem.
  • Have a post mortem with all team members involved to collect any issues that were encountered during the datacenter migration. This will help build a stronger team in the future and bring to light any issues that could have been prevented and take those into future projects.

Thoughts

Datacenter migrations can potentially be one of the most complicated processes that an organization may have to undertake. It involves very precise and calculated changes to be made to systems so that those systems can either remain online during the migration or be back online as soon as possible. The rewards of a successful migration can be tremendous. It can allow a business to grow its technology needs into a more modern and technologically advanced datacenter. Additionally, it can allow an organization to transition to the public cloud for housing resources. Either way, proper planning, testing, and execution of well thought out plans will allow an organization to pull off the challenging feat of a successful datacenter migration.

OK, folks that’s it for this post. Have a nice day guys…… Stay tuned…..!!!!!

Don’t forget to like & share this post on social networks!!! I will keep on updating this blog. Please do follow!!!

AWS – Converting EC2 from an On-Demand to Reserved Instance

I could be dead wrong, but I imagine that many customers begin their AWS journey using on-demand instances in order to “test the water” to avoid making rash long-term commitment. Now let’s assume the initial testing of an organizations application(s) in AWS is successful and the organization is ready to go “all in” the cloud, they’ll more carefully consider cost optimizations. If an organization has deployed EC2 instances and made a commitment to AWS, “converting” on-demand to reserved EC2 instances is an easy way to provide significant cost savings….or is it?

The simple table below provides a few examples showing the cost savings that can be achieved when using reserved instances (RIs). Running a Linux t2.micro EC2 instance as a RI can save an organization approximately 42% per month (assuming the instance runs 24/7) as its monthly cost is $4.92 vs an on-demand instance which would cost $8.50 per month.

1

How do you convert a on-demand instance to a RI? Do you have to shut an instance down, create an AMI, and then redeploy using the RI “license”? Can you even convert an existing instance or do you have to build all new instances to take advantage of the savings offered by RIs? If you’ve worked with AWS for some length of time, you may be laughing to yourself because you’re familiar with RIs and know the answer, but these are questions I thought of because I didn’t wake up one day knowing everything about AWS.

Now I don’t want to keep you in suspense so I’ll share the answer with you now. What do you do to convert an on-demand instance to a RI? Practically nothing….you don’t need to make any changes to your EC2 instance, you don’t even need to reboot them, you just need to make sure you purchase an appropriate reserved instance. It’s important to understand that an AWS RI is not a “special VM”, but is nothing more than a billing concept; it may be helpful to think of a RI as being a coupon, or maybe a groupon, that is used to apply discounts to on-demand EC2 instances.

If you can save money using RIs, shouldn’t you buy RI groupons for every instance in your AWS environment? I mean, why wouldn’t you want to reduce your monthly costs? RIs seem like a no-brainer right?!?! Organizations can benefit from the lower costs associated with running RIs. AWS benefits as well because RIs have a term associated with them….you can’t buy RIs month-to-month, you purchase them in 12 or 36 month commitments. So before you purchase RIs for all of your EC2 instances, you need to evaluate how long or often your EC2 instances will be active.

Take the Linux t2.micro example from the table above. The cost to run that instance 24/7 for a year is $102 whereas a 12-month RI for a Linux t2.micro VM costs $59. If you’ll run this instance 24/7 for 1 year, then purchasing a RI for this instance IS a no-brainer.

But what if you will only need this instance 24/7 for 4 months OR you will run the instance all year but limit its use to a typical 40 hour work week? Using on-demand pricing, the cost of running the instance 24/7 for 4 months would be $34; the cost of running the instance 40 hours a week would be $24 for the year. In each example, running the instance using on-demand pricing is cheaper than the $59 RI cost (unless you forget to power it off), thus a RI should not be purchased for either of these use cases. Granted, this example is simple but I believe useful for understanding the concept of an AWS RI.

Purchasing a Reserved Instance

  1. Perform an assessment on your EC2 instances to determine if you should even consider RIs over on-demand pricing for them. Don’t assume RIs are appropriate for all of your EC2 instances but instead do an application analysis to evaluate the instances purpose and ongoing use.  Once the use case is determined, do a cost analysis to determine if a RI makes more sense than on-demand pricing.
  1. From the AWS Services page, click EC2 | Reserved Instances | Purchase Reserved Instances
  2. On the Purchase Reserved Instances page, enter the following and click Search:
  • Payment option: No Upfront, Partial Upfront, or All Upfront.
  • Term: One-year or three-year. A year is defined as 31536000 seconds (365 days). Three years is defined as 94608000 seconds (1095 days).
  • Offering class: Convertible or Standard.

In addition, a Reserved Instance has a number of attributes that determine how it is applied to a running instance in your account:

  • Instance type: In this example, t2.micro
  • Tenancy: Whether your instance runs on shared (default) or single-tenant (dedicated) hardware.
  • Platform: The operating system; for example, Windows or Linux/Unix

2

NOTE:   Reserved Instances do not renew automatically; when they expire, you can continue using the EC2 instance without interruption, but you are charged On-Demand rates. In the above example, when the Reserved Instances that cover the T2 and C4 instances expire, you go back to paying the On-Demand rates until you terminate the instances or purchase new Reserved Instances that match the instance attributes.

  1. When the search results are returned, click Add to Cart to the right of the RI you wish to purchase, and then click View Cart.

When purchasing a RI, you can choose between a Standard or Convertible offering class.  RIs apply to a single instance family, platform, scope, and tenancy over the length of the term selected.  If your compute needs change, you may want to modify or exchange your RI.  The choice of a Standard or Convertible RI determines your options in this regard.

Using a Standard RI, some attributes, such as instance size can be modified during the length of the term; however, the instance type cannot be modified.  If you purchase a t2.micro RI, you can modify the instance type to support any t2 instance type, say t2.large as an example, but you cannot modify the instance type from a t2 to an m4.  If a Standard RI is no longer needed by an organization, it can be sold in the RI Marketplace.

A Convertible RI can be exchange for a new instance family, instance type, platform, scope, or tenancy but it cannot be sold in the RI Marketplace if no longer needed.

3

  1. On the Shopping Cart page, click Purchase to complete the purchase of the RI.
  1. When the purchase has been completed successfully, you’ll see a dialog box telling you that it may take a few the RI to change from a payment-pending to active state. Click Close.

4

  1. When the RI State changes to active, congratulations! You have successfully converted an on-demand instance to a RI.  If you have a running instance that matches the specifications of the RI, the billing benefit is immediately applied; you don’t have to do anything else.

5.png

If purchased correctly, RIs can drastically reduce your AWS costs.  If purchased incorrectly, RIs can increase your AWS costs.  I can’t stress enough the need to evaluate/assess your EC2 instances in regards to their application and ongoing use cases so as to determine if on-demand or RI pricing is more cost effective….remember, a RI requires a 12 or 36 month term to obtain their cost savings.  To kick start the evaluation process, use AWS Trusted Advisor and review the Amazon EC2 Reserved Instances Optimization recommendations.

OK, folks that’s it for this post. Have a nice day guys…… Stay tuned…..!!!!!

Don’t forget to like & share this post on social networks!!! I will keep on updating this blog. Please do follow!!!

AWS RDS Backup Methods

RDS picture


AWS RDS Service provides two backup methods:

A] Automated backups
B] User-initiated DB snapshots

Automated backups are initiated during the creation of an RDS instance. You set the backup window, the retention period for the backups and you’re ready. Bingo…!!!

Although automated backups seem attractive because they are easy to manage, they have some constraints.
1. Retention : There is a 35-day retention period limit. After exceeding that limit, the snapshot is then deleted.
2. Deleted database : If you accidentally delete a database for any reason, automated backups are going to be removed too.
3. Disaster Recovery : Automated backups can only be restored from within the same region. If you have a DR strategy, you might want to move the snapshots between multiple regions.

These 3 constraints can be resolved with the User-initiated AWS RDS DB snapshots.

1. AWS RDS DB snapshots can be retained for as long as you wish. Means RDS manual snapshots will only be deleted when the administrator specifically deletes the RDS snapshots.
2. AWS RDS DB snapshots are not removed if you accidentally delete the database.
3. AWS RDS DB snapshots can be moved from one region to another without any constraint.

Amazon Web Services gives us three ways to take manual DB Snapshots :

  1. AWS Management Console
  2. AWS CLI Command line utility
  3. Various Amazon SDKs.

As long as manual snapshots are taken regularly and kept secure, it’s easy to recover your database within a few minutes. Ultimately, you have to pay for the backup storage that you use until those backups are deleted.

In order to really enjoy RDS manual snapshots, it is best practice to automate manual RDS snapshots to serve your database backup policy. Rather, I would emphasize you all to use AWS Lambda Service to automate RDS manual Snapshot backup strategy.

H@ppy doing Automation ahead…..!!!

OK, folks that’s it for this post. Have a nice day guys…… Stay tuned…..!!!!!

Don’t forget to like & share this post on social networks!!! I will keep on updating this blog. Please do follow!!!

Vertical Scaling and Horizontal Scaling in AWS

Vertical and horizontal scaling are two distinct ways of ramping up your cloud capabilities, depending on the amount of traffic you receive.


Scaling an on-premise infrastructure is hard. You need to plan for peak capacity, wait for equipment to arrive, configure the hardware and software, and hope you get everything right the first time. But deploying your application in the cloud can address these headaches. If you plan to run your application on an increasingly large scale, you need to think about scaling in cloud computing from the beginning, as part of your planning process.

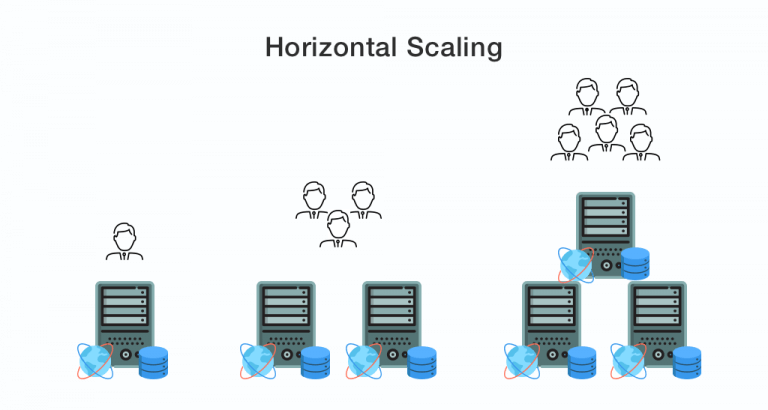
There are mainly two different ways to accomplish scaling, which is a transformation that enlarges or diminishes. One is vertical scaling and the other is horizontal scaling. Let’s understand these scaling types with AWS.

Vertical Scaling

For the initial users up to 100, a single EC2 instance would be sufficient, e.g. t2.micro/t2.nano. The one instance would run the entire web stack, for example, web app, database, management, etc. The original architecture is fine until your traffic ramps up. Here you can scale vertically by increasing the capacity of your EC2 instance to address the growing demands of the application when the users grow up to 100. Vertical scaling means that you scale by adding more power (CPU, RAM) to an existing machine. AWS provides instances up to 488 GB of RAM or 128 virtual cores.

vertical-scaling

Vertical Scaling in Cloud

There are few challenges in basic architecture. First, we are using a single machine which means you don’t have a redundant server. Second, machine resides in a single AZ, which means your application health is bound to a single location.

To address the vertical scaling challenge, you start with decoupling your application tiers. Application tiers are likely to have different resource needs and those needs might grow at different rates. By separating the tiers, you can compose each tier using the most appropriate instance type based on different resource needs.

Now, try to design your application so it can function in a distributed fashion. For example, you should be able to handle a request using any web server and produce the same user experience. Store application state independently so that subsequent requests do not need to be handled by the same server. Once the servers are stateless, you can scale by adding more instances to a tier and load balance incoming requests across EC2 instances using Elastic Load Balancing (ELB).

Horizontal Scaling

Horizontal scaling essentially involves adding machines in the pool of existing resources. When users grow up to 1000 or more, vertical scaling can’t handle requests and horizontal scaling is required. Horizontal scalability can be achieved with the help of clustering, distributed file system, and load balancing.

Loosely coupled distributed architecture allows for scaling of each part of the architecture independently. This means a group of software products can be created and deployed as independent pieces, even though they work together to manage a complete workflow. Each application is made up of a collection of abstracted services that can function and operate independently. This allows for horizontal scaling at the product level as well as the service level.

horizontal-scaling

Horizontal Scaling in Cloud

How To Achieve Effective Horizontal Scaling

The first is to make your application stateless on the server side as much as possible. Any time your application has to rely on server-side tracking of what it’s doing at a given moment, that user session is tied inextricably to that particular server. If, on the other hand, all session-related specifics are stored browser-side, that session can be passed seamlessly across literally hundreds of servers. The ability to hand a single session (or thousands or millions of single sessions) across servers interchangeably is the very epitome of horizontal scaling.

The second goal to keep square in your sights is to develop your app with a service-oriented architecture. The more your app is comprised of self-contained but interacting logical blocks, the more you’ll be able to scale each of those blocks independently as your use load demands. Be sure to develop your app with independent web, application, caching and database tiers. This is critical for realizing cost savings – because, without this micro service architecture, you’re going to have to scale up each component of your app to the demand levels of the services tier getting hit the hardest.

When designing your application, you must factor a scaling methodology into the design – to plan for handling increased load on your system, when that time arrives. This is should not be done as an afterthought, but rather as part of the initial architecture and its design.

OK, folks that’s it for this post. Have a nice day guys…… Stay tuned…..!!!!!

Don’t forget to like & share this post on social networks!!! I will keep on updating this blog. Please do follow!!!
 

Amazon Redshift Architecture and Its Components

1

Amazon Redshift is a fully managed highly scalable data warehouse service in AWS. You can start using Redshift with even a few GigaBytes of data and scale it to PetaBytes or more. In this article, I will talk about Amazon Redshift architecture and its components, at a high level.

2

Redshift is meant to work in a Cluster formation. A typical Redshift Cluster has two or more Compute Nodes which are coordinated through a Leader Node. All client applications communicate with the cluster through the Leader Node.

Leader Node

The Leader Node in a Redshift Cluster manages all external and internal communication. It is responsible for preparing query execution plans whenever a query is submitted to the cluster. Once the query execution plan is ready, the Leader Node distributes query execution code on the compute nodes and assigns slices of data to each to compute node for computation of results.

Leader Node distributes query load to compute node only when the query involves accessing data stored on the compute nodes. Otherwise, the query is executed on the Leader Node itself. There are several functions in Redshift architecture which are always executed on the Leader Node. You can read SQL Functions Supported on the Leader Node for more information on these functions.

Compute Nodes

Compute Nodes are responsible for actual execution of queries and have data stored with them. They execute queries and return intermediate results to the Leader Node which further aggregates the results.

There are two types of Compute Nodes available in Redshift architecture:

  • Dense Storage (DS) – Dense Storage nodes allow you to create large data warehouses using Hard Disk Drives (HDDs) for a low price point.
  • Dense Compute (DC) – Dense Compute nodes allow you to create high-performance data warehouses using Solid-State Drives (SSDs).

A more detailed explanation of how responsibilities are divided among Leader and Compute Nodes is depicted in below diagram:

3

Node slices

A compute node consist of slices. Each Slice has a portion of Compute Node’s memory and disk assigned to it where it performs Query Operations. The Leader Node is responsible for assigning a Query code and data to a slice for execution. Slices once assigned query load work in parallel to generate query results.

Data is distributed among the Slices on the basis of Distribution Style and Distribution Key of a particular table. An even distribution of data enables Redshift to assign workload evenly to slices and maximizes the benefit of parallel processing.

Number of Slices per Compute Node is decided on the basis of the type of node. You can find more information on this in  About Clusters and Nodes.

Massively parallel processing (MPP)

Redshift architecture allows it to use Massively parallel processing (MPP) for fast processing even for the most complex queries and a huge amount of data. Multiple compute nodes execute the same query code on portions of data to maximize parallel processing.

Columnar Data Storage

Data in Redshift is stored in a columnar fashion which drastically reduces the I/O on disks. Columnar storage reduces the number of disk I/O requests and minimizes the amount of data loaded into the memory to execute a query. Reduction in I/O speeds up query execution and loading less data means Redshift can perform more in-memory processing.

Redshift uses Sort Keys to sort columns and filter out chunks of data while executing queries. Read more about Columnar Data Storage.

Data compression

Data compression is one of the important factors in ensuring query performance. It reduces storage footprint and enables loading of large amounts of data in the memory fast. Owing to Columnar data storage, Redshift can use adaptive compression encoding depending on the column data type. Read more about using compression encodings in Compression Encodings in Redshift.

Query Optimizer

Redshift’s Query Optimizer generate query plans that are MPP-aware and takes advantage of Columnar Data Storage. Query Optimizer uses analyzed information about tables to generate efficient query plans for execution. Read more about Analyze to know how to make the best of Query Optimizer.

13 Key points to remember about Amazon Redshift

1. Massively Parallel Processing (MPP) Architecture

Amazon Redshift has a Massively Parallel Processing Architecture. MPP enables Redshift to distribute and parallelize queries across multiple nodes. Apart from queries, the MPP architecture also enables parallel operations for data loads, backups and restores.
Redshift architecture is inherently parallel; there is no additional tuning or overheads for distribution of loads for the end users.

2. Redshift supports Single Node Clusters to 100 Nodes Clusters with up to 1.6 PB of storage

You can provision a Redshift cluster with from a single Node to 100 Nodes configuration depending on the processing and storage capacity required. Redshift nodes come in two sizes XL & 8XL. XL node comes with 2 TB attached storage and 8XL node comes with 16 TB attached storage.
Clusters can have a maximum of 32 XL nodes (64 TB) or 100 8XL nodes (1.6 PB).

3. Redshift does not support multi AZ deployments

Redshift clusters currently support only Single AZ deployments. You will not be able to access Redshift n case of an Availability Zone failure. An AZ failure will not affect the durability of your data, you can start using the cluster once the AZ is available. To ensure continuous access to your data, you can launch an additional cluster in different AZ. You can restore a new Redshift cluster in a different AZ by recreating it using the snap shots of the original cluster. Alternately, you can have a cluster running always in a different AZ, accessing the same set of data from S3.

4. Columnar Storage & Data Compression

Redshift provides columnar data storage. With Columnar data storage, all values for a particular column are stored contiguously on the disk in sequential blocks.

Columnar data storage helps reduce the I/O requests made to the disk compared to a traditional row based data storage. It also reduces the amount of data loaded from the disk improving the processing speed, as more memory is available for query executions.

As similar data is stored sequentially, Redshift compresses the data rather efficiently. Compression of data further reduces the amount of I/O required for queries.

5. Parallel uploads to Redshift are supported only for data stored in Amazon S3 & DynamoDB

Redshift currently supports data imports/copy only from S3 and DynamoDB. Using COPY command from S3 is the fastest way to load data into Redshift. COPY loads data in parallel and is much more efficient than Insert statement.

Redshift does not have support to load data in parallel from other sources. You will either have to use Insert statements or write scripts to first load data into S3 and then into Redshift. This could sometime be a complex process depending on the size and format of data available with you.

6. Redshift is Secure

Amazon provides various security features for Redshift just like all other AWS services.
Access Control can be maintained at the account level using IAM roles. For data base level access control, you can define Redshift database groups and users and restrict access to specific database and tables.

Redshift can be launched in Amazon VPC. You can define VPC security groups to restrict inbound access to your clusters.
Redshift allows data encryption for all data which is stored in the cluster as well as SSL encryption for data in transit.

7. Distribution Keys

Redshift achieves high query performance by distributing data evenly on all the nodes of a cluster and slices within a node.

A Redshift cluster is made of multiple nodes and each node has multiple slices. The number of slices is equal to the number of processor cores in a node. Each slice is allocated a portion of node’s memory and disk space. During query execution the data is distributed across slices, the slices operate in parallel to execute the queries.

To distribute data evenly among slices, you need to define a distribution key for a table while creating it. If a distribution key is defined during table creation, any data, which is loaded in the table, is distributed across nodes based on the distribution key value. Matching values from a distribution key column are stored together.

A good distribution key will ensure even load distribution across slices, uneven distributions will cause some slices to handle more load than others, and slows down the query execution.

If a distribution key is not defined for a column, the data is by default distributed in a round robin fashion by Redshift.

8. You cannot change the distribution key once a table is created

A distribution key for a table cannot be amended once it is created. This is very important to keep in mind while identifying the right distribution key for a table.

To change a distribution key, the only work around is to create a new table with the updated distribution key, load data into this table and rename the table as the original table after deleting the original table.

9. Redshift does not enforce Database Constraints or support Indexes

You can define database constraints like unique, primary and foreign keys but these constraints are informational only and are not enforced by Redshift. These constraints, though are used by Redshift to create query execution plans, ensuring optimal execution. If the primary key and foreign key constraints are correct, they should be declared while creating tables to have optimal executions.

Redshift also does not support creation of secondary indexes on columns.

10. Redshift does not automatically reclaim space that is freed on deletes or updates

Redshift is based on PostgreSQL version 8.0.2 and inherits some of its limitations. One such limitation is that Redshift does not reclaim and reuse the space freed up by delete or update commands. The free space left by deleted or updated records in large numbers can cost some extra processing.

Every update command in Redshift first deletes the existing row and then inserts a new record with the updated values.

To reclaim this unused space, you can run the Vacuum command. Vacuum command reclaims the freed space and also sorts data in the disk.

Ideally there would be very little updates or deletes once data is loaded in a data warehouse, but in case it does, you can run the Vacuum command.

11. Query Concurrency in a cluster

Redshift enforces a query concurrency limit of 15 on a cluster.

Queries in are executed in a queue, by default there is one queue per query cluster which can run up to five concurrent queries. Users can modify the configuration to allow up to 15 queries per queue and a maximum of 8 queues.

The concurrent queries for a cluster across queues is limited to a maximum of 15. Users cannot modify this configuration.

12. Amazon QuickSight

QuickSight is a useful tool for building dashboards and BI Reports on Redshift. It is tuned into work faster with Redshift.

13. Amazon Redshift Utils in GitHub

Amazon Redshift Github utilities available in github have highly useful admin scripts.

https://github.com/awslabs/amazon-redshift-utils

This post will help you get off the ground from Traditional on-premise Data warehouse and usher you into the New era of Data warehousing with Amazon Redshift.

OK, folks that’s it for this post. Have a nice day guys…… Stay tuned…..!!!!!

Don’t forget to like & share this post on social networks!!! I will keep on updating this blog. Please do follow!!!

Operating System Containers vs. Application Containers

Thanks to Docker, containers have gained significant popularity lately among Developer and Ops communities alike. Many people simply want to use Docker because of its rising popularity, but without understanding if a Docker container is what they need. There are many container technologies out there to choose from, but there is a general lack of knowledge about the subtle differences in these technologies and when to use what.

The need for containers

Hypervisor based virtualization technologies have existed for a long time now. Since a hypervisor or full virtualization mechanism emulates the hardware, you can run any operating system on top of any other, Windows on Linux, or the other way around. Both the guest operating system and the host operating system run with their own kernel and the communication of the guest system with the actual hardware is done through an abstracted layer of the hypervisor.

hypervisor-based-virtualization

This approach usually provides a high level of isolation and security as all communication between the guest and host is through the hypervisor. This approach is also usually slower and incurs significant performance overhead due to the hardware emulation. To reduce this overhead, another level of virtualization called “operating system virtualization” or “container virtualization” was introduced which allows running multiple isolated user space instances on the same kernel.

What are containers?

Containers are the products of operating system virtualization. They provide a lightweight virtual environment that groups and isolates a set of processes and resources such as memory, CPU, disk, etc., from the host and any other containers. The isolation guarantees that any processes inside the container cannot see any processes or resources outside the container.

os-virtualization

The difference between a container and a full-fledged VM is that all containers share the same kernel of the host system. This gives them the advantage of being very fast with almost 0 performance overhead compared with VMs. They also utilize the different computing resources better because of the shared kernel. However, like everything else, sharing the kernel also has its set of shortcomings.

  • Type of containers that can be installed on the host should work with the kernel of the host. Hence, you cannot install a Windows container on a Linux host or vice-versa.
  • Isolation and security — the isolation between the host and the container is not as strong as hypervisor-based virtualization since all containers share the same kernel of the host and there have been cases in the past where a process in the container has managed to escape into the kernel space of the host.

Common cases where containers can be used

As of now, I have noticed that containers are being used for two major uses – as a usual operating system or as an application packaging mechanism. There are also other cases like using containers as routers but I don’t want to get into those in this blog.

I like to classify the containers into special types based on how they can be used. Although I will also point out that it is not a must to use a container technology for just that case, and you may very well use it for other cases. I’ve classified them this way because I find certain technologies easier to use for certain cases. Based on the two uses I mentioned above I’ve classified containers as OS containers and application containers.

OS containers

OS containers are virtual environments that share the kernel of the host operating system but provide user space isolation. For all practical purposes, you can think of OS containers as VMs. You can install, configure and run different applications, libraries, etc., just as you would on any OS. Just as a VM, anything running inside a container can only see resources that have been assigned to that container.

OS containers are useful when you want to run a fleet of identical or different flavors of distros. Most of the times containers are created from templates or images that determine the structure and contents of the container. It thus allows you to create containers that have identical environments with the same package versions and configurations across all containers.

os-containers

Container technologies like LXC, OpenVZ, Linux VServer, BSD Jails and Solaris zones are all suitable for creating OS containers.

Application containers

While OS containers are designed to run multiple processes and services, application containers are designed to package and run a single service. Container technologies like Docker and Rocket are examples of application containers. So even though they share the same kernel of the host there are subtle differences make them different, which I would like to talk about using the example of a Docker container:

Run a single service as a container

When a Docker container is launched, it runs a single process. This process is usually the one that runs your application when you create containers per application. This very different from the traditional OS containers where you have multiple services running on the same OS.

Layers of containers

layers of containers

Any RUN commands you specify in the Dockerfile creates a new layer for the container. In the end when you run your container, Docker combines these layers and runs your containers. Layering helps Docker to reduce duplication and increases the re-use. This is very helpful when you want to create different containers for your components. You can start with a base image that is common for all the components and then just add layers that are specific to your component. Layering also helps when you want to rollback your changes as you can simply switch to the old layers, and there is almost no overhead involved in doing so.

Built on top of other container technologies

Until some time ago, Docker was built on top of LXC. If you look at the Docker FAQ, they mention a number of points which point out the differences between LXC and Docker.

The idea behind application containers is that you create different containers for each of the components in your application. This approach works especially well when you want to deploy a distributed, multi-component system using the microservices architecture. The development team gets the freedom to package their own applications as a single deployable container. The operations teams get the freedom of deploying the container on the operating system of their choice as well as the ability to scale both horizontally and vertically the different applications. The end state is a system that has different applications and services each running as a container that then talk to each other using the APIs and protocols that each of them supports.

In order to explain what it means to run an app container using Docker, let’s take a simple example of a three-tier architecture in web development which has a PostgreSQL data tier, a Node.js application tier and an Nginx as the load balancer tier.

In the simplest cases, using the traditional approach, one would put the database, the Node.js app and Nginx on the same machine.

simplest-3-tier-architecture

Deploying this architecture as Docker containers would involve building a container image for each of the tiers. You then deploy these images independently, creating containers of varying sizes and capacity according to your needs.

3-tier-architecture-using-docker

Summary

So in general when you want to package and distribute your application as components, application containers serve as a good resort. Whereas, if you just want an operating system in which you can install different libraries, languages, databases, etc., OS containers are better suited.

os-vs-app-containers

OK, folks that’s it for this post. Have a nice day guys…… Stay tuned…..!!!!!
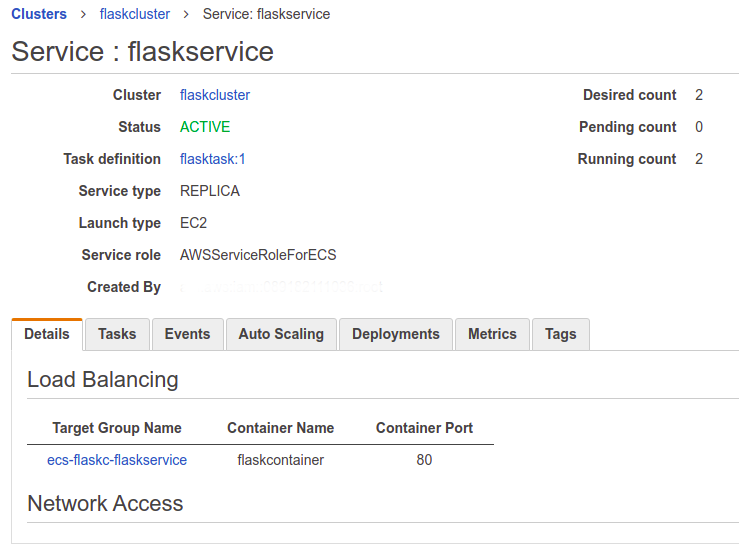
Don’t forget to like & share this post on social networks!!! I will keep on updating this blog. Please do follow!!!